Sunday, March 8, 2015

Herb Roasted Carrots, Brussels Sprouts, and Potatoes

So, my produce box this week contained Brussels Sprouts.... I had tried them before and was not really a fan. But, that was years ago and I am re-trying things so... I kept them (as opposed to trading them in or giving them away). I am happy to report, I am glad I did!
I also had 3 GIANT carrots in my box and had no clue what to do with them. Into the dish they go! But, I felt it needed something else too.... Well, this weeks box also had a bunch of creamer potatoes (hmm... what's a "creamer" potato?).
I think it came out great! This dish was yummy and was quite colorful (if only I had some of the purple potatoes from a couple weeks ago left).


Preheat the oven to 425. And get to chopping...

You will need:
Brussels Sprouts
Carrot(s)
Creamer Potatoes
Fresh Thyme
Fresh Rosemary
Green Onion
4 cloves of Garlic
2 T Fire Roasted Pepper Oil (recipe coming soon*)
       You can use olive oil instead (If you do, maybe add some peppers to the dish)
A few shakes of Parmesan
Salt/pepper to taste

You'll notice I didn't really put in amounts for most of the ingredients... Well, I didn't measure them and the amounts are very flexible. If you love carrots, use more carrots. If you aren't so sure about the brussels sprouts, use a little less of those. I just used all the brussels sprouts from my box and one giant carrot and enough potatoes to have relatively even amounts of the three. Chop them all into bite-size pieces. I cut the garlic cloves into quarters (they were large) but you could mince them if you wanted. I have the green onions from the produce box 2 weeks ago growing in a jar in my kitchen. I can hardly use them in enough dishes to keep them trimmed! They just keep on growing! I chopped up the green tops of several of those. I got 2 whole sprigs of rosemary (but you probably want to pull these out before serving) and pulled the leaves off several sprigs of thyme.

I put all that, as well as the remaining ingredients, into a plastic bag and shook it to mix it and coat everything evenly with oil and seasoning. I poured it into a glass baking dish and put it in the oven for 20 min, took it out and stirred it and put it back in for another 20 min, until the carrots and potatoes were done. I served it with some slow-grilled chicken and it was delicious. I thought I made enough to have leftovers but we ATE IT ALL!


 I will definitely make it again. I might even remove brussels sprouts from the list of foods I "don't like"... Hope you enjoy it as much as we did!

~Sarah

A new day!

Well friends and followers (which at this point I am pretty sure is just my mother, HI Mom!), this post will not contain a recipe. It is to explain that there will be a bit of a shift in the blog. My love of cooking first manifested itself in a desire to experiment with recipes my mother taught me while I was growing up. That love has now evolved into creating recipes of my own from scratch.

So, what is different, you ask? Me. I am different. During the period of time since I have posted (2.5 years!), my life went through a bit of a shift. I decided to try to do less things that are bad for me and more things that are good for me. Now, that sounds very non-specific... I know. It was and is non-specific. This shift started with valuing myself. Something I had forgotten how to do. That is not what I am here to talk about though; I am here to talk about FOOD!

Part of treating myself poorly, was eating whatever was easiest and or cheapest. So, I started paying more attention to what I was eating. I am not going to get in to all the worrisome "food" that makes it into our diets... It is almost unavoidable to consume these questionable products, unless one goes to arguably extreme measures. Now, my long term plan may seem extreme to many, but in the short term, the plan is simply to make better food choices. Try new things, with an open mind. Try things I tried before and "didn't like," with an open mind. So far, it's going great! I now regularly eat many healthier foods that were not a part of my diet before.

I also started growing my own herbs. I loved being able to walk out on to the back patio, cut some fresh thyme and rosemary for use in my next meal. My partner and I are currently in the process of renovating our back yard. We intend to grow much more than just herbs. In addition to the herbs and fruit trees we started growing last year, this year we've have started: cucumbers, green beans, tomatoes, bell peppers, canary melon, onions, garlic and many others are on the way! All of that is to say, in addition to putting my recipes on this blog, I may also post about what we are growing and how our permaculture-type garden is going. I feel it is a part of the process of cooking, truly from scratch.

Another change that will affect the blog is a recent discover of mine... A few weeks ago I came across SWFL Produce Co-Op. I was very intrigued, as I have been doing a lot of research on CSA (community supported agriculture). While SWFL Produce isn't a CSA, they are providing (mostly) local, organic produce to the community on a subscription-like basis. They don't grow everything themselves and consumers aren't providing funds up front for the promise of food later, but they are providing a wonderful service by obtaining and organizing delicious fresh produce into boxes available for weekly pick-up. Fresh local produce without the risk of a CSA-- That sounds like a win-win to me. Each Monday the contents of the following Saturdays boxes are posted. Then, if you want a box (or several) you let them know which box(es) you want and then you go pick it up on Saturday. Simple.

Let me tell you, when I went and got my first $25 "combo" box, I was blown away. They also have a $20 veggie box and a $20 fruit box, which I have gotten in the subsequent weeks. So much awesome food for such a great price! As a matter of fact, someone in the co-op did a price comparison. How much would the contents of each box cost if you purchased it at Publix? It turns out that we're saving an average $9 a box by purchasing the produce from SWFL Produce instead. On top of that, the money I do spend, supports local businesses and local farmers.

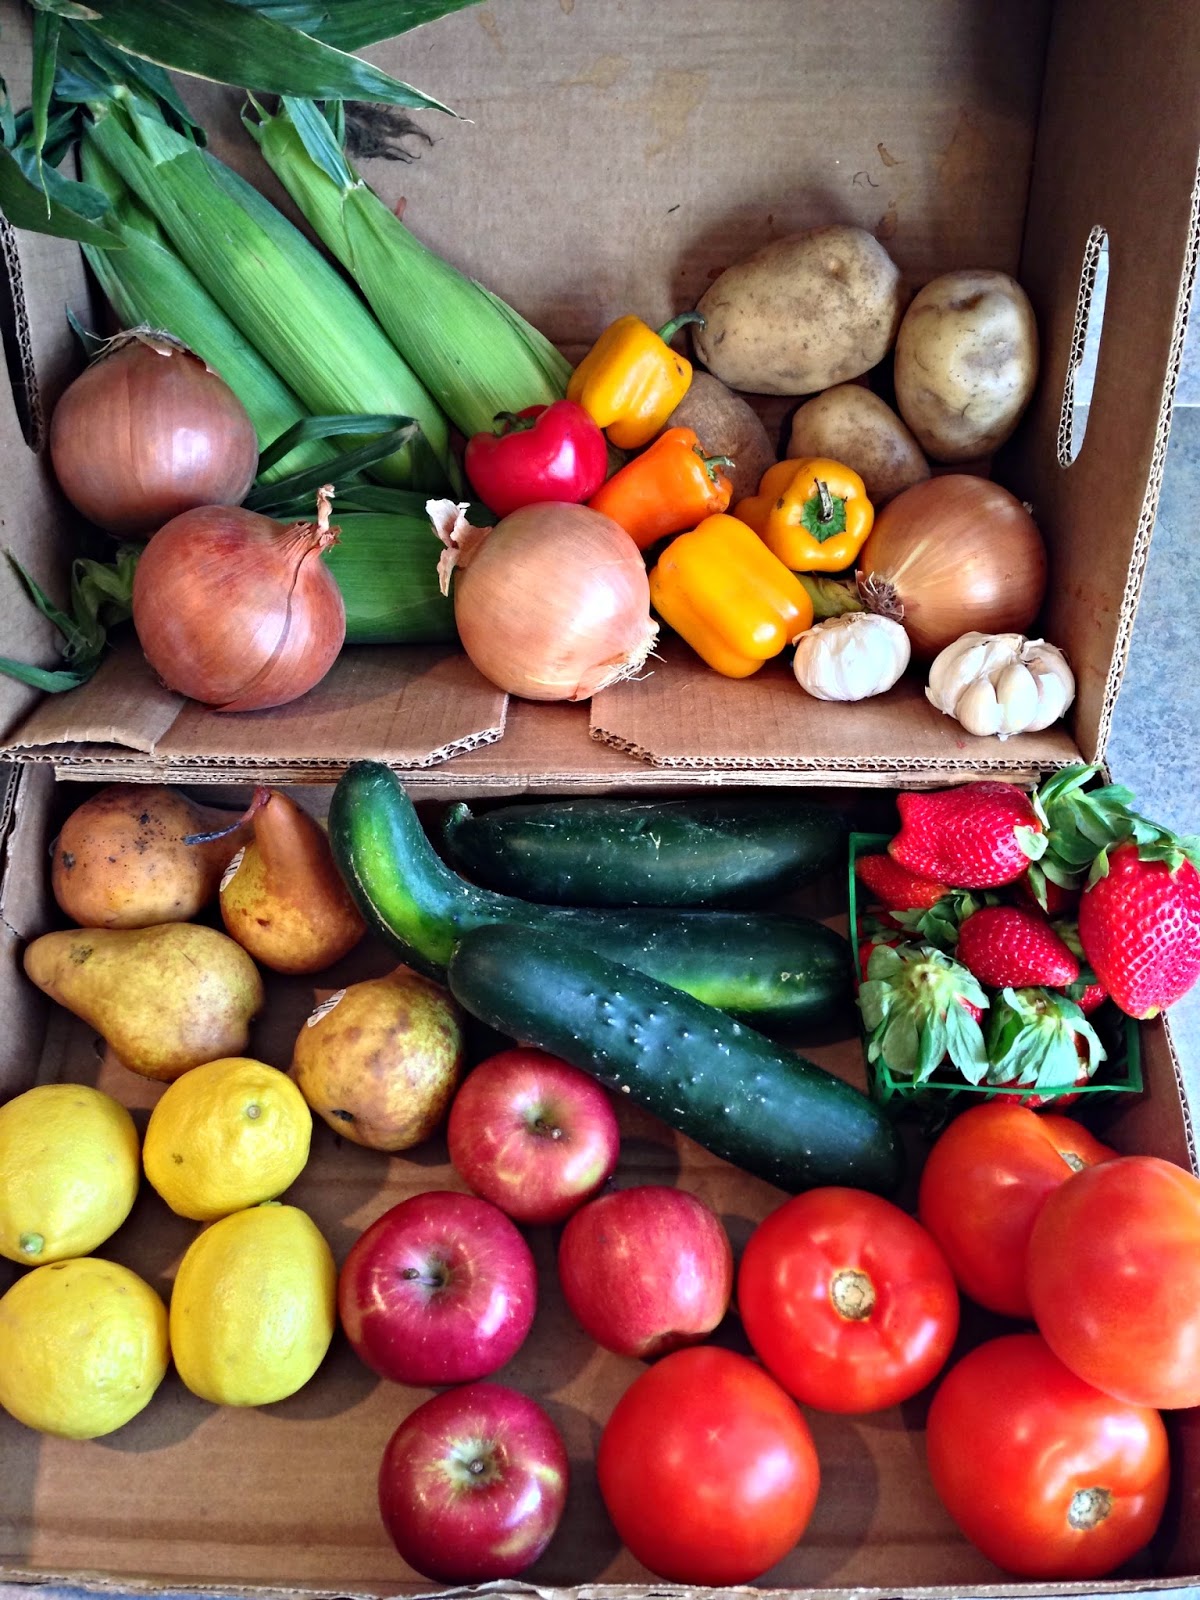
The picture to the right was the first box I got. Everything was fresh and delicious. I came home and immediately went to work cooking. That night I made refrigerator dill pickles and fire roasted pepper oil (will post the recipes when I get around to it). We had the Sweet Corn with dinner and it was delicious! I was hooked. This week was my 4th week and I will be getting the boxes for the foreseeable future.

In addition to saving money and allowing me to conveniently "shop locally", these produce boxes inspire me to create, try new things, and eat healthier. So, I have decided to share the recipes I am creating with the world and maybe inspire some other people too!

If you live in Charlotte or Lee County in Florida, I strongly suggest trying SWFL Produce. If you live elsewhere, look to see if there is something similar in your area. I bet you'll love it!

~Sarah

Monday, October 1, 2012

Chicken Noodle Soup with Great Great Grandma's Danish Dumplings.


So, this recipe is one of the recipes my mom taught me and is one of the first real meals I learned to make for myself after leaving for college. I have since tweaked the soup a LITTLE, but it is pretty true to the original. My Great Great Grandma's Danish Dumplings, however, I have not changed at all.* A good friend of mine says they "taste like Christmas" and she wasn't wrong! ;)
This meal is the epitome of comfort food, in my opinion. Every time I make it, I think about when I was a kid making the dumplings with my mom (and sometimes brother). When I am sick this is the only food that sounds good. I LOVE this dish!

Soup ingredients:

  • 3-4 chicken breasts
  • 1/4c butter
  • 2 boxes chicken broth
  • 1/2 a small sweet onion, chopped
  • 3-4 cloves garlic, minced
  • 2t seasoning salt (more or less to taste)
  • 1T parsley
  • 1 bay leaf
  • 2 stalks celery cleaned and cut into bite sized pieces
  • about 1/2 a bag of baby carrots
  • a little chicken bouillon (if you want a little extra flavor in the broth)
  • 1-2 potatoes, diced (I haven't been adding this lately... I think there's plenty of starch in it already)
  • 1/2 a package of egg noodles (I use "NoYolks")
Great Great Grandma's Danish Dumpling ingredients:
  • 1/2c water
  • 4T butter
  • 1t salt
  • 1t sugar
  • 2/3c flour
  • 2 eggs
  • 1/2t nutmeg (*I usually cut this in half, just as my mom did :)
I usually make a double batch of the dumplings with the amount of soup here.

The soup part of this dish is fantastic in the crockpot. However, I made it on the stove in a big stock pot this time. 
I melted the butter in the pan and added the onions and garlic. After a few minutes, I added the parsley and cooked over medium heat until the onions were clear. Then, I added the chicken, sprinkled the seasoning salt over them, and seared the outside for a couple minutes on each side. Once that was done, I added the chicken broth, bouillon, celery, and carrots. The hard part is now over... for now. Just put a lid on it, turn the heat down, and let it simmer for a few hours until the chicken is fall-apart-tender. 

The dumplings take about 45 min to make from start to finish, and the noodles that I use take about 12 minutes to cook. So you will want to time them accordingly to be sure not to over cook the noodles.

Dumpling dough before adding eggs. Cooling after adding flour.
To make my Great Great Grandma's Danish Dumplings, bring the water, butter, salt, and sugar to boil in a medium sized sauce pan. Once it has come to a full rolling boil for a min or two, quickly add the flour and mix well, stirring until the mixture forms a dough ball that does not stick to the sides of the pan. (Important note: Several of the times I made this dish the dough was too sticky and runny... the only thing I could come up with to explain why sometimes it comes out perfect and others it doesn't is, the times it doesn't work I didn't let it boil long enough. So, not enough water evaporated. It is just a theory... but if you think you know what else it could be, please let me know!) 

Dumpling dough after adding eggs and nutmeg.
Ready to go into the broth.
At this point, you will need to let the dough cool before adding the eggs, usually about 20 min, give or take, depending on how well your pot holds heat. (Sometimes I will make this part earlier and put it in the fridge while the soup cooks. If I do that, I take it out in enough time for it to come back to room temperature before I move on to the next step. I don't know if that really matters... but, as I mentioned, the recipe can be a bit... temperamental. So, I don't want to take any chances.) While I wait for the dough to cool I usually whisk together the eggs and nutmeg. 


Once the dough is cool you will add the eggs and nutmeg a little at a time and stir very well until all the lumps are out and the texture is consistant. (Now is about when you will want to add the noodles to the soup.) Drop spoonfuls of dumpling dough into boiling broth, cover and cook for about 5 minutes. 

I often fill my soup to the brim with other goodies leaving no room for the dumplings. To remedy the situation I will cook the dumplings in a separate pot and add them to the soup just before serving. If you try to cram the dumplings into a pot that has too much in it already the dumplings get destroyed when you stir... It is also best to cook the dumplings in a separate pot if you make the soup part in the crockpot.

The only other deviations I make some times, particularly if I am impatient or sick, is put all the veggies and spices in the broth and bring that to a full boil until the veggies are cooked. Then, I cut up and add a rotisserie chicken from Publix. Instead of waiting hours for the chicken to be cooked and tender, it's ready in the time it takes to cook a carrot. And, it's almost as delicious! Also, sometimes I thicken the broth at the end with a little cornstarch... makes it more of a gravy than a soup, but it's tasty!


That just about covers it! Chicken Noodle Soup with my Great Great Grandma's Danish Dumplings is one of my favorite meals in the whole world! It is hardy, delicious and filling. 

Give it a try I know you will love it. :)
~Sarah


Sunday, September 23, 2012

Citrus Teriyaki Chicken

To make this Citrus Teriyaki Chicken you will need:

2-4 chicken breasts
  • Marinade:
    • 3/4c teriyaki sauce/marinade
    • 1T soy sauce (more or less depending on how salty you want it)
    • 1T minced onions
    • 2 cloves garlic minced
  • Glaze:
    • 3T olive oil
    • 1 pinch red pepper flakes
    • 1T orange rind
    • 1/2T lemon rind (I didn't have a grater for the rinds. So, I just sliced a few twists off of the rind)
    • juice of an orange
    • juice of half a lemon
    • 1T rice wine vinegar
    • 2 cloves garlic, sliced
    • 1T honey
    • 1+1/2T corn starch combined with just enough water to mix and get a liquid. (this is for thickening the glaze at the end)


Start by combining all the marinade ingredients in a large zipper bag with the chicken and allow it to sit. I let mine sit for a few hours, but you can do more or less depending on how much flavor you want it to have. Mine actually had a little too much teriyaki flavor and not enough orange flavor. I have compensated a little bit in the recipe presented here; but you could probably sacrifice some of the marinating time and it would be just as good if not better.

Once the chicken has marinated for a while, you can start to prepare the glaze. In a large sauce pan, combine the olive oil, garlic, orange and lemon rinds, red pepper flakes. Let that heat up until it starts to bubble and give off some aroma. Then, pull the chicken out of the marinade, save the marinade though, and place chicken in the pot. Sear the outside of the chicken. Then, add the remaining glaze ingredients (except the corn starch) and pour some or all of the marinade in the pot as well. (I added all of it but as I said I would reduce the teriyaki flavor next time.) Stir, cover, and let simmer (stirring occasionally) for a couple hours until chicken is tender (for faster prep, cook chicken longer before adding glaze ingredients then just cook chicken until it is done all the way through). Right before serving combine the corn starch-water mix and bring sauce to boil just a couple minutes, until thickened. Serve and eat!

I served it with garlic herb couscous, mango slices, and french style green beans. It was very tasty (despite the imbalanced teriyaki/orange ratio).
Next time, I will do a few things differently: First, I will sear the chicken on the grill instead of in the pot, to give it just a little different flavor. I will also add more orange juice OR I will add some frozen orange juice concentrate so the sauce doesn't get too watery. And perhaps I will add some more red pepper flakes and honey, but we'll see about that. I believe this recipe will also work well in a crock pot.
Give it a shot!

~Sarah


Friday, September 21, 2012

Breaded Halibut

Halibut was on sale, so we bought some. I had never made halibut before, and I had no idea what to do with it! I did some googling, and I read that Halibut has very little fat content, which means that grilling and baking could dry it out. So, I decided frying it was the way to go. I also happened to have a TON of Rice Krispie cereal on hand, so I decided to try that as a breading for the Halibut!

To prepare the fish you will need:
  • For breading
    • 3c Rice Krispie cereal- crushed
    • 1/2c parmesan 
    • 2t lemon pepper
    • 2t onion powder
    • 1t garlic salt
    • 1/2T parsley
  • For wet mix:
    • 1/2c mayonnaise
    • 1T minced Garlic
    • 2t Old Bay seasoning
To make the fish, put the Rice Krispies in a plastic bag (the large gallon size is best), and crunch them up. You can squeeze it, hit it with a hammer, or various other methods--but I find that rolling it with a rolling pin (or something else that is somewhat cylinder shaped, like a beer bottle lol ;) works great! Once the Rice Krispies are all crunched up, put in the remaining dry ingredients in the bag and shake to mix well.


In a bowl, mix together all of the wet ingredients.
Now, I used mayonnaise for the base of it because I wanted to try something new. When I have made breaded chicken in the past, I have used butter, or milk and egg, to wet the meat before breading.... and I am sure using either of those for this recipe would have been fine. But, I had seen some recipes that used mayo and I figure since mayo is mostly egg and oil (and a bunch of other crap), perhaps it was the best of both worlds. So, I gave it a shot! And, I must say, I will do it again!! It was thicker than the other "liquids" I have used, which meant that more breading stuck to it, and I like that--If meat is breaded, it needs to be crunchy!  
Put the fish pieces into the mayo mix to coat them. Then, put them into the breading, pushing down to make sure plenty of crunchiness sticks ;)

I fried them on medium heat, in a 50/50 olive oil/butter blend, for just a few minutes on each side until browned, and turned to brown all sides. You have to be pretty gentile in order to not knock off the breading. I knew mine was ready when the halibut fell apart. 

I made a packet of hollandaise sauce because I am lazy and soooooo bad at cream sauces... and put it over some pasta and a little over the halibut. It had the perfect lemony zing to compliment the fish.

The breaded halibut was TASTY! If halibut wasn't usually so expensive I would definitely buy it more. It was meaty, not at all fishy, and super tender. You should definitely try this one!

~Sarah


Sunday, September 9, 2012

Tomato Lime Tilapia

This recipe is something I threw together the other night. It came out ok, but there are definitely some changes I will make next time. I was feeling incredibly lazy, and I compromised a little too much. lol Oh well!

Ingredients:

  • 2 tilapia filets
  • 2T olive oil/ butter
  • 1/4 of a lime's juice
  • 2 cloves of garlic, minced
  • 1/4 of an onion, chopped
  • 1 can of diced tomatos (I used Rotel with lime and cilantro)
  • lemon pepper seasoning or salt and pepper 
To make the tilapia, put about a tablespoon of olive oil in the bottom of a ceramic baking dish, lay the tilapia in it, and sprinkle seasoning salt on the filets. Spread the garlic and onion evenly over them, and slice up about a tablespoon of butter to put on top (or just drizzle over a little more olive oil). Then, squeeze the lime over it, and pour the can of tomatos on top. 


I baked it in the oven at 375 for 20'ish minutes (until the fish was done). 
And voila, Tomato Lime Tilapia! 


In retrospect, I would have done several things different. I think it would be better if I had drained the liquid off the tomatoes before adding them (I made the assumption it was the lime juice, of "cilantro and lime", but I think it was mostly water). Next time, I will probably use a little white wine in it; I just didn't have any this time.-- But I think it would be good :) 
This recipe is kind of similar to how I make arroz con pollo (I will post that recipe sometime soon). So, next time I will make it with saffron rice, instead of the angel hair pasta I used this time. It also might be better on the grill. Maybe.

Give it a shot, and let me know if you think of anything that could improve on this early version of Tomato Lime Tilapia!

~Sarah


Sunday, September 2, 2012

Raspberry Glazed Salmon

Well, I happened to have a ton of raspberry jam on hand and decided to give it a whirl on some salmon. The recipe is very much still a work in progress; this was only the 2nd time I made it. It was better the first time but I don't remember what I did differently! :( Oh well! It was still very good and there's always next time! (I will update this if I figure it out)

For the salmon you will need:

  • 1lb. salmon
  • 2t minced garlic
  • 1T dried onion (although I am sure fresh is just as good if not better)
  • 1T olive oil
  • 2T coconut oil
  • juice of 1/4 a lime or lemon
  • 1T white wine (or hard apple cider, as I had handy this evening ;) 
  • salt to taste
  • sriracha sauce (last time I used cayenne pepper but I think the sriracha has a better flavor, both work though)

For the raspberry glaze:
  • 1/4c raspberry jam
  • 1T white vinegar
  • pinch of crushed red pepper flakes

I served with:
  • strawberry, peach, mango salsa (just cut up fruit with a splash of lemon on it)
  • Parmesan couscous (from a box)
  • steamed artichoke (Mmmm! One of my favorites!)

To cook the salmon I have used the grill and the oven, I prefer the grill, I think. However, this time I used the oven. I put the olive oil on the bottom of a glass baking dish, which was just big enough to fit the fish. Then, put the salmon in and drizzled the coconut oil over top of it. I spread the onion, garlic, and sriracha sauce evenly over it and let it sit. I waited an hour or so, but you don't have to. Then, about 15 min before I put the salmon in the oven, I added the lemon/lime juice and white wine to the pan.
Meanwhile, I put all the ingredients for the raspberry glaze in a small sauce pan, put it on the stove (on medium-low heat) and stirred to remove all the lumps-- I kept this lightly bubbling, stirring often, until the fish was done.
I put the salmon in a 400 degree oven for about 15 min, until the salmon was almost done. I poured a little of the raspberry glaze, just enough to cover the top, over the fish and switch the oven to broil for a minute or two. Careful not to burn it; just caramelize the sauce a little bit.

Once the fish was out of the oven and on a plate, I drizzled a little more raspberry glaze over it, put some strawberry, peach, mango salsa on top and chowed down!
This fish is great with couscous, but I am sure it would be good with some pasta or coconut rice too! 

I think the dish is still missing something, but I'm not sure what it is. If you figure it out please tell me! 

Hope you enjoy!

~Sarah