Monday, March 30, 2015

Quick Refrigerator Pickles!

So, I LOVE pickles! I especially love it when they're super crisp and delicious.
Every time I get my hands on cucumbers, I turn at least some of them into pickles. I am told these are more marinated cucumbers. But, I'm not sure when they cross from marinated cucumber territory into pickle territory... they taste like pickles to me!

This recipe is for 2 Quart jars- So, half of each amount goes in each jar.
Ingredients:
2-3 large cucumbers
1/2 a bell pepper
1T whole black pepper
3T salt
3T white vinegar
8 pearl onions
6 cloves of garlic
a bunch of dill... differs based on fresh/dried
water

I simply chop the cucumbers and bell peppers, I take the papery outside off the onions and garlic, but I leave them whole. I split all the ingredients between the 2 jars and fill the rest of the way with water, leaving only a little space at the top (as seen in the picture). Then, shake them and put them in the fridge for 24 hours (shaking every 8 hours or so). DONE!

When I have enough fresh dill, I cram as much in there as seems reasonable. This time I only had a little fresh dill (my plants haven't recovered from the last batch of pickles). So, I supplemented with dried dill. When I have dried, store bought, dill I find the strength of their flavor varies greatly. (That being said, I usually use *about* 2T dried dill in each of the 2 jars and adjust accordingly.) You can use any amount of pretty much any ingredient EXCEPT the salt and vinegar. You can, of course, tweak those a bit too... but I can tell you from experience, it's easier to add more than remove it if it's too strong... Note: I have never had pickles that were "too dilly" I just don't know if that's possible. I have however, had pickles that are too oniony... please, learn from my mistakes. lol

As you can tell, the recipe is not exact. But, remember you can always add more after your first taste!

Hope you like it!

Tuesday, March 24, 2015

Modified French Chicken


I have this photocopy of a photocopy of a recipe that my mom cut out of a newspaper some 20+ years ago. I remember she would make a slightly altered version using white wine instead of red, fresh mushrooms instead of canned, and corn starch to thicken it, instead of tapioca. I have made it a number of times and each time I deviate a little further from the recipe. Well, the produce box this week had mushrooms in it and someone in the co-op posted a photo of mushrooms on some pasta and it reminded me of this recipe. So, that's what we had for dinner last night! As you can see, the original recipe was a crock pot recipe; If you use a crock pot you can just put the chicken in, put the chopped up veggies and other ingredients in the pot and turn it on low-medium. Stir occasionally. And it's done in 7+ hours. When I have time, I do cook it that way but, I didn't have that luxury this time. The following instructions are for stove-top preparation.

You will need:
1-2 lbs of chicken (I used 4 chicken breasts)
Mushrooms
Carrots
Cherry or Grape Tomatoes
1/2c Wine (white or red, both are good)
2T Butter (I used 1T of butter and 1T of my pepper oil)
2c Chicken Broth
1/2-1 Sweet Onion
3 cloves of Garlic
The leaves from a few sprigs of fresh Thyme (or 1/2t dried)
1 Bay Leaf
Corn Starch or Flour to thicken.
Salt to taste
Start by chopping up your garlic and onion into very small pieces.  Put that in a pot with the butter/oil and turn on low. Finish chopping the remaining veggies into bite size pieces set them aside for now. 
Turn up the burner to medium and when the pot is hot and the garlic and onions are sizzling add the chicken. Turning after a couple minutes, once the first side is just barely cooked. Then, you can add the all the remaining ingredients (except the corn starch/flour and about 1/4c of the chicken broth, save those till the very end). When it starts to boil turn the burner back to low.
I let this simmer on the stove for about an hour and a half while I finished up some homework. When everything in the pot is cooked through is long enough, but the longer you let it cook, the more tender the chicken will be and the more flavorful the sauce. I like to cook it as long as I can to get as close to the crock-pot-chicken as possible. Anyway, when it's about done mix the reserved 1/4c of broth with 1-2T corn starch or flour. I used flour this time, because I was out of corn starch; but I prefer the corn starch. Once mixed, add it to the pot, stir, and let simmer a couple more minutes until the sauce has thickened.

 I usually serve this over pasta, but I have also made it with rice and that was good too. Give it a try, let me know what you think!


Monday, March 23, 2015

Fire Roasted Pepper Infused Oil

I promised the Fire Roasted Pepper Oil recipe a couple weeks ago. So, here it is! It's super simple and makes adding a little extra flavor to a dish really easy.

You will need:
A canning jar or 2
Pure Olive Oil- not extra virgin
Peppers- So far, I've only done this with bell peppers and baby bell peppers but I'm sure you could use other peppers as well. I've heard chili pepper infused oil is really good!

In this batch used a total of 4 full size bell peppers for the 2 quart jars shown to the right. Half a pepper of each color (red, green, orange, and yellow) went into each jar.
I have seen similar recipes which included garlic and/or onions as well. I might try that next time!!

Preheat the oven to about 275°F. Wash the peppers, cut them in half, remove the seeds and stems. I wait and make this whenever I happen to be grilling so I don't have to light the grill just to roast peppers for 10 minutes. You could also roast them in the oven if you don't have, or don't want to use, a grill.

So, once the peppers are prepared, and the grill is hot, you put them on the grill for about 5 minutes on each side. Just until they are a little softened and have grill marks on them. You don't want them too charred or too mushy. They will cook a little more in the next step.

When they are ready, put half of each pepper in each jar. Then, pour the olive oil over them. You can really use as much or as little as you want but make sure to leave at least an inch or so of space at the top. Place the jars in a metal roasting pan and into your pre-heated oven until the oil in them is bubbling steadily, about 20-30 minutes. This is why you don't want to over fill the jars, so it doesn't bubble over. After the oil reaches a boil, remove the tray of jars from the oven and carefully place the jar lids on the jars. Make sure they are on straight in order to properly form a seal, but be careful the metal lids heat up fast! As the jars cool the lids should suction and seal. Allow them to cool all the way to room temperature before transferring them to the fridge.

From what I've read, the peppers and oil can be kept for up to 3 months in the refrigerator, or longer in the freezer. The oil becomes cloudy and solidifies a bit in the fridge making it really easy to scoop out a tablespoon or 2 for cooking. I find myself replacing olive oil with this pepper oil in pretty much all my dishes. So, I go through it pretty quickly but I did put one of these jars in the freezer because I doubt I could use both quarts within 3 months.

Hope you enjoy it as much as we do!

*A note about canning: I am a complete noob to canning. I have a basic understanding but not much experience, yet. Many recipes similar to this make no reference to sealing the jars at all (most skip the oven step completely-but I think it gets more pepper flavor into the oil). It is refrigerator kept and is good for 3 months even without being sealed — So, sealing the jar is probably not imperative, for this recipe. I do wonder though, could properly sealed jars keep for longer, maybe even out of the fridge? I've read arguments against oven canning, but I can find just as many people who are pro-oven. Would I need to pressure can them, since there is oil involved?
Have you made or canned infused oils before? If so, what have you learned?

Sunday, March 22, 2015

TACOS!

So, this weekend we spent most of the time working in the yard. We we did get to go to ECHO's annual Food and Farm Festival, which was awesome! While we were there we picked up some more plants for our backyard food forest in progress. If you have not been to ECHO, I highly recommend it! When we got back from that, we picked up this weeks produce box and headed home. I started cooking dinner and while it simmered we planted. What I made for dinner was inspired by the Cubanelle Peppers in this weeks box: TACOS!!


You will need:

1lb Ground Beef
1 Cubanelle Pepper
1 Baby Bell Pepper
2 Tomatoes
1 small Onion
4-5 cloves of Garlic
Fresh Oregano
Fresh Savory
1-2T Chili Powder
1-2T Sirracha
1 7oz can of Tomato sauce
Salt and Pepper to taste


I started by removing the seeds from the peppers (setting them aside for potential planting) and putting the peppers in the food processor with the tomatoes, garlic, and onion. I had a huge onion left from my produce box the other week. So, I used half of that instead of a whole normal sized onion. I chopped up the fresh herbs. I had never used Savory before; it is one if the things we got at ECHO. I really liked it!

I browned the meat. Once the meat was about half way cooked, I poured in the salsa-y mix from the food processor along with the remaining ingredients. You can of course alter your amounts of everything, particularly the Chili Powder and Sirracha to your prefered level of spice.

I let that cook down for about 2 hours and soak up all the flavor. You could just cook until the meat is cooked through, but I would not add the can of tomato sauce. That way it isn't too runny, since the liquid won't have time to evaporate off.

I served it topped with chopped Grape Tomatoes, Romaine Lettuce (both from the produce box), black olives, shredded cheese, and sour cream. I wanted to have avocado on it too but they were not ripe enough. It came out super tasty!

Sunday, March 8, 2015

Herb Roasted Carrots, Brussels Sprouts, and Potatoes

So, my produce box this week contained Brussels Sprouts.... I had tried them before and was not really a fan. But, that was years ago and I am re-trying things so... I kept them (as opposed to trading them in or giving them away). I am happy to report, I am glad I did!
I also had 3 GIANT carrots in my box and had no clue what to do with them. Into the dish they go! But, I felt it needed something else too.... Well, this weeks box also had a bunch of creamer potatoes (hmm... what's a "creamer" potato?).
I think it came out great! This dish was yummy and was quite colorful (if only I had some of the purple potatoes from a couple weeks ago left).


Preheat the oven to 425. And get to chopping...

You will need:
Brussels Sprouts
Carrot(s)
Creamer Potatoes
Fresh Thyme
Fresh Rosemary
Green Onion
4 cloves of Garlic
2 T Fire Roasted Pepper Oil (recipe coming soon*)
       You can use olive oil instead (If you do, maybe add some peppers to the dish)
A few shakes of Parmesan
Salt/pepper to taste

You'll notice I didn't really put in amounts for most of the ingredients... Well, I didn't measure them and the amounts are very flexible. If you love carrots, use more carrots. If you aren't so sure about the brussels sprouts, use a little less of those. I just used all the brussels sprouts from my box and one giant carrot and enough potatoes to have relatively even amounts of the three. Chop them all into bite-size pieces. I cut the garlic cloves into quarters (they were large) but you could mince them if you wanted. I have the green onions from the produce box 2 weeks ago growing in a jar in my kitchen. I can hardly use them in enough dishes to keep them trimmed! They just keep on growing! I chopped up the green tops of several of those. I got 2 whole sprigs of rosemary (but you probably want to pull these out before serving) and pulled the leaves off several sprigs of thyme.

I put all that, as well as the remaining ingredients, into a plastic bag and shook it to mix it and coat everything evenly with oil and seasoning. I poured it into a glass baking dish and put it in the oven for 20 min, took it out and stirred it and put it back in for another 20 min, until the carrots and potatoes were done. I served it with some slow-grilled chicken and it was delicious. I thought I made enough to have leftovers but we ATE IT ALL!


 I will definitely make it again. I might even remove brussels sprouts from the list of foods I "don't like"... Hope you enjoy it as much as we did!

~Sarah

A new day!

Well friends and followers (which at this point I am pretty sure is just my mother, HI Mom!), this post will not contain a recipe. It is to explain that there will be a bit of a shift in the blog. My love of cooking first manifested itself in a desire to experiment with recipes my mother taught me while I was growing up. That love has now evolved into creating recipes of my own from scratch.

So, what is different, you ask? Me. I am different. During the period of time since I have posted (2.5 years!), my life went through a bit of a shift. I decided to try to do less things that are bad for me and more things that are good for me. Now, that sounds very non-specific... I know. It was and is non-specific. This shift started with valuing myself. Something I had forgotten how to do. That is not what I am here to talk about though; I am here to talk about FOOD!

Part of treating myself poorly, was eating whatever was easiest and or cheapest. So, I started paying more attention to what I was eating. I am not going to get in to all the worrisome "food" that makes it into our diets... It is almost unavoidable to consume these questionable products, unless one goes to arguably extreme measures. Now, my long term plan may seem extreme to many, but in the short term, the plan is simply to make better food choices. Try new things, with an open mind. Try things I tried before and "didn't like," with an open mind. So far, it's going great! I now regularly eat many healthier foods that were not a part of my diet before.

I also started growing my own herbs. I loved being able to walk out on to the back patio, cut some fresh thyme and rosemary for use in my next meal. My partner and I are currently in the process of renovating our back yard. We intend to grow much more than just herbs. In addition to the herbs and fruit trees we started growing last year, this year we've have started: cucumbers, green beans, tomatoes, bell peppers, canary melon, onions, garlic and many others are on the way! All of that is to say, in addition to putting my recipes on this blog, I may also post about what we are growing and how our permaculture-type garden is going. I feel it is a part of the process of cooking, truly from scratch.

Another change that will affect the blog is a recent discover of mine... A few weeks ago I came across SWFL Produce Co-Op. I was very intrigued, as I have been doing a lot of research on CSA (community supported agriculture). While SWFL Produce isn't a CSA, they are providing (mostly) local, organic produce to the community on a subscription-like basis. They don't grow everything themselves and consumers aren't providing funds up front for the promise of food later, but they are providing a wonderful service by obtaining and organizing delicious fresh produce into boxes available for weekly pick-up. Fresh local produce without the risk of a CSA-- That sounds like a win-win to me. Each Monday the contents of the following Saturdays boxes are posted. Then, if you want a box (or several) you let them know which box(es) you want and then you go pick it up on Saturday. Simple.
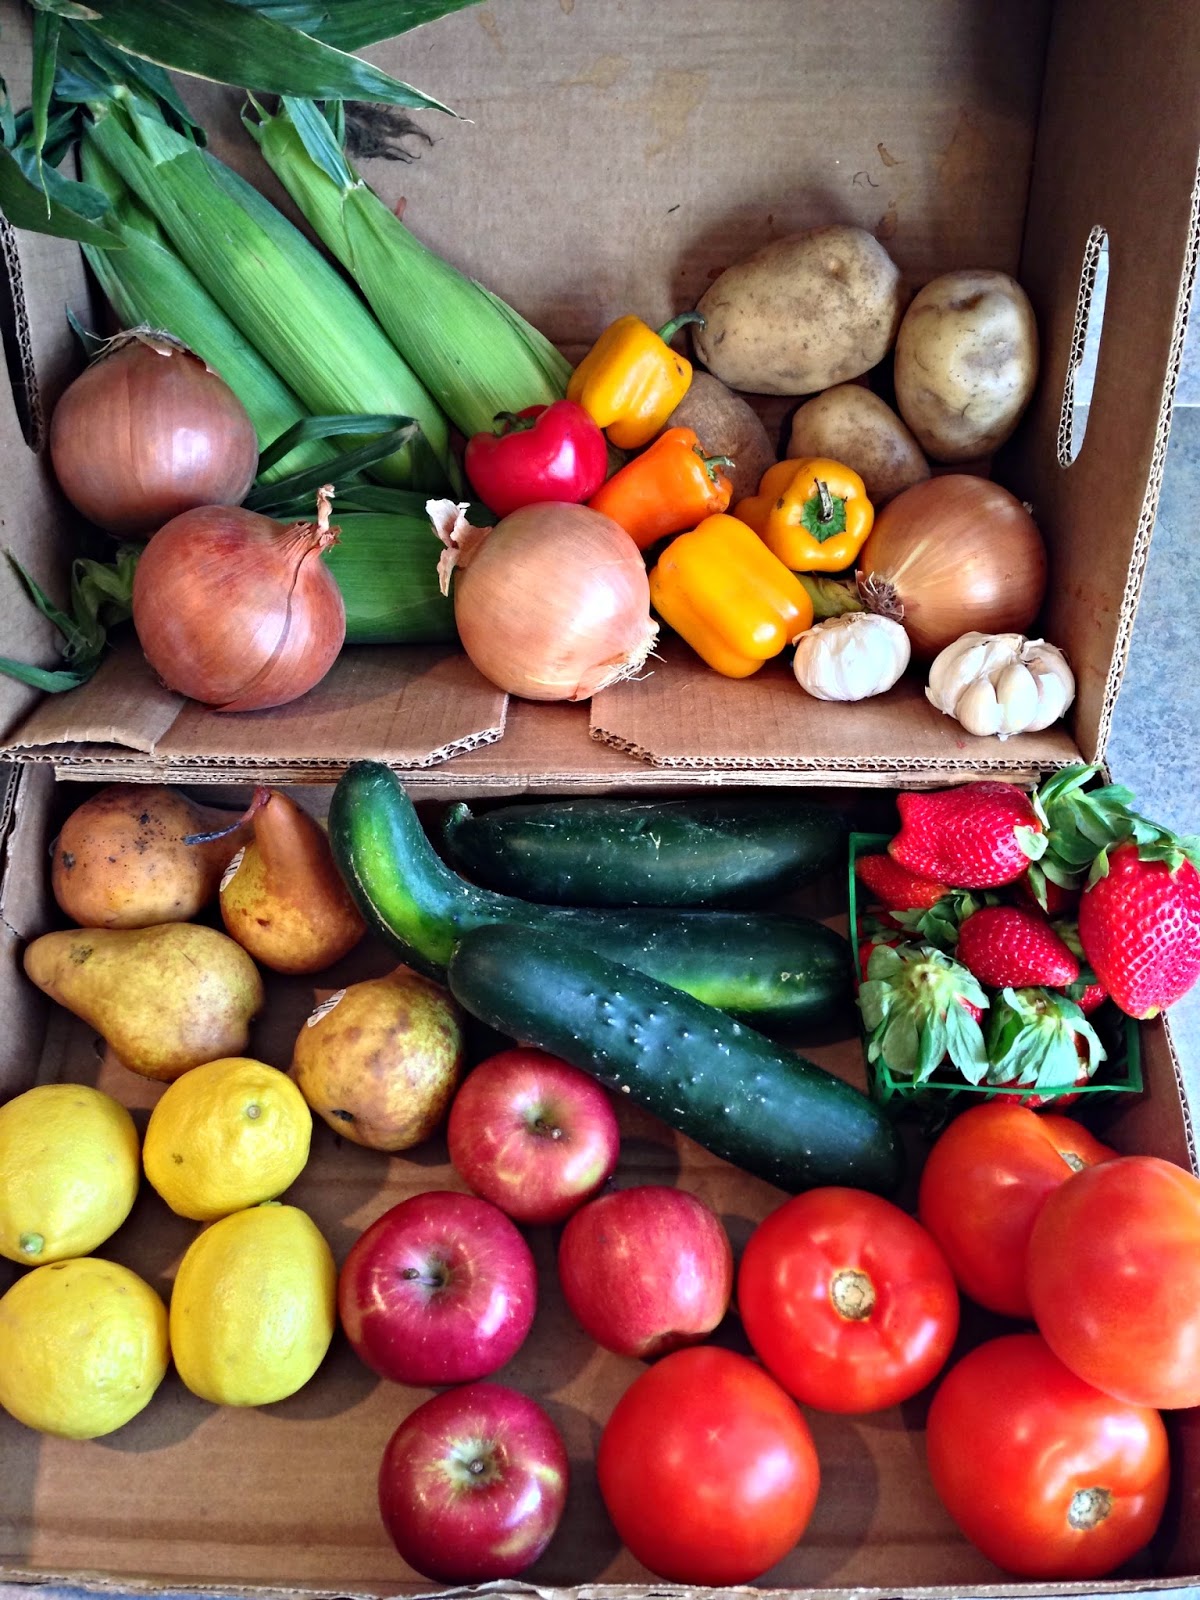
Let me tell you, when I went and got my first $25 "combo" box, I was blown away. They also have a $20 veggie box and a $20 fruit box, which I have gotten in the subsequent weeks. So much awesome food for such a great price! As a matter of fact, someone in the co-op did a price comparison. How much would the contents of each box cost if you purchased it at Publix? It turns out that we're saving an average $9 a box by purchasing the produce from SWFL Produce instead. On top of that, the money I do spend, supports local businesses and local farmers.

The picture to the right was the first box I got. Everything was fresh and delicious. I came home and immediately went to work cooking. That night I made refrigerator dill pickles and fire roasted pepper oil (will post the recipes when I get around to it). We had the Sweet Corn with dinner and it was delicious! I was hooked. This week was my 4th week and I will be getting the boxes for the foreseeable future.

In addition to saving money and allowing me to conveniently "shop locally", these produce boxes inspire me to create, try new things, and eat healthier. So, I have decided to share the recipes I am creating with the world and maybe inspire some other people too!

If you live in Charlotte or Lee County in Florida, I strongly suggest trying SWFL Produce. If you live elsewhere, look to see if there is something similar in your area. I bet you'll love it!

~Sarah